
Profile GPU,Every app is exclusive and could have extraordinary performance troubles. While there are satisfactory practices, you want to research the specific configuration of your app to find and fix overall performance issues.
To find out what causes your app’s particular overall performance problems, use gear to accumulate statistics approximately your app’s execution behavior. Understand and examine what you spot, then enhance your code. Android Studio and your device offer profiling gear to file and visualize the rendering, compute, memory, and battery overall performance of your app.
In this realistic, you use the Profile GPU Rendering tool in your tool to visualise how long it takes an app to draw frames to the display screen.
Important:To run the Profile GPU Rendering device and whole this realistic exercising, you need a bodily or digital tool strolling as a minimum Android 4.1 (API degree 16) with Developer Options turned on.
Your app need to continuously draw the screen rapid sufficient in your users to peer easy, fluid motions, transitions, and responses. To this stop, usually, contemporary devices try to show 60 frames according to second (a frame fee of 60 FPS), making 16 milliseconds to be had to each frame. Therefore, your app has to do its paintings in sixteen milliseconds or much less for each display screen refresh.
Important:For real-world overall performance tuning, run your app and the gear on a bodily tool, now not an emulator, as the records you get from going for walks on an emulator may not be correct. Always test on the lowest-give up tool that your app is targeting. If you do now not have a bodily tool, you may use an emulator to get an idea of how your app is performing, despite the fact that some overall performance statistics from the emulator may not be accurate.
Profile GPU,What you should already KNOW
- You need to be capable of download an app from GitHub, open it with Android Studio, and run it.
- It enables to be familiar with the following standards and terminology:
- CPU: A central processing unit (CPU) is the electronic circuitry within a laptop that includes out the instructions of a laptop program by using performing the simple mathematics, logical, control, and input/output (I/O) operations unique with the aid of the instructions.
- GPU: A portraits processing unit (GPU) is a specialized electronic circuit designed to hastily manage and display pix.
- Frame charge: Frame fee (expressed in frames per 2d, or FPS) is the frequency (fee) at which consecutive images, called frames , are displayed in an lively show. Mobile gadgets typically display 60 frames according to 2d, which seems as smooth motion to the human eye.
- Display listing: A show list (or show file) is a series of photos commands that define an output image as a sequence of primitives (together with traces and primary shapes).
- Rendering pipeline: A conceptual version that describes the stairs that a photographs device plays when it renders graphical facts on the display. At the very best stage, the pipeline creates a show listing from application commands inside the CPU, passes the show listing to the GPU, and the GPU executes the show listing to attract the display.
As a refresher, watch the Invalidation, Layouts, and Performance video for an outline of the Android rendering pipeline. Read the Rendering and Layout concept bankruptcy as well as How Android Draws Views.
Profile GPU,What you will LEARN
You will learn how to:
- Use the Profile GPU Rendering tool to visualize Android drawing the display screen.
Profile GPU,What you will DO
- Run the Profile GPU Rendering device at the RecyclerView app and look at the results.
- Create a easy app that has overall performance troubles and run the Profile GPU Rendering tool on it.
Profile GPU,App overview
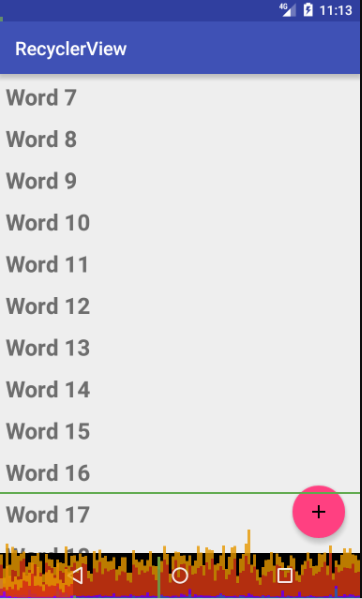
- For the primary part of this practical, use the RecyclerView app.
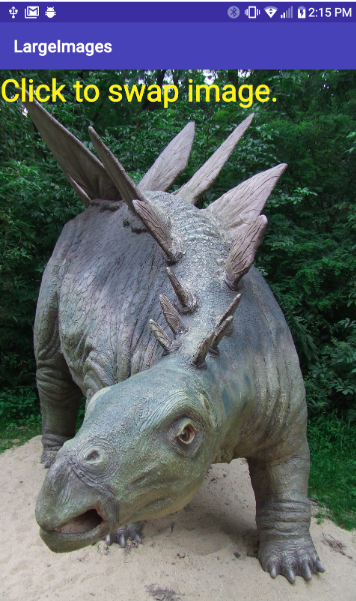
- For the second part of this sensible, you construct an app that hundreds images, LargeImages, to look how photo length impacts performance. In a later sensible, you analyze extra approximately the use of pictures efficiently.
The following screenshot shows one way of implementing the LargeImages app.
Run the Profile GPU Rendering tool
Putting pixels on the display screen entails 4 primary pieces of hardware:
- The CPU computes display lists. Each display listing is a series of photos commands that outline an output image.
- The GPU (graphics processing unit) renders pictures to the display.
- The reminiscence stores your app’s images and statistics, among other things.
- The battery provides electrical energy for all the hardware at the tool.
Each of those pieces of hardware has constraints. Stressing or exceeding those constraints can purpose your app to be slow, have horrific show performance, or exhaust the battery.
The Profile GPU Rendering tool offers you a short visual illustration of the way lots time it takes to render the frames of a UI window relative to the sixteen-ms-in keeping with-body benchmark. The device suggests a colored bar for each frame. Each bar has colored segments indicating the relative time that every degree of the rendering pipeline takes, as shown in the screenshot underneath.
What it’s correct for:
- Quickly seeing how monitors carry out against the sixteen-ms-in keeping with-body goal.
- Identifying whether the time taken by means of any a part of the rendering pipeline stands proud.
- Looking for spikes in frame rendering time associated with person or application moves.
Disable Instant Run
Note:While profiling an app, disable Instant Run inAndroidStudio. There is a small performance impact when the use of Instant Run. This performance impact should interfere with records provided through performance profiling tools. Additionally, the stub methods generated even as the use of Instant Run can complicate stack lines. See About Instant Run for information.
In Android Studio, flip off Instant Run for the bodily and digital devices you want to profile.
- Open the Settings or Preferences dialog: On Windows or Linux, select File > Settings from the menu bar. On Mac OSX, pick out Android Studio > Preferences from the menu bar.
- Navigate to Build, Execution, Deployment > Instant Run.
- Deselect the Restart activity on code changes checkbox.
Install and run the RecyclerView app
For this device walkthrough, use the RecyclerView app from the Android Developer Fundamentals route.
- Download the RecyclerView app.
- Open the app in Android Studio and run it. You may additionally need to uninstall previous variations of the app.
- Interact with the app. Does the app scroll easily?
- Press the + button and add words to the listing. Does this transformation how you perceive the performance of the app?
RecyclerView is an effective way of showing facts, and on most gadgets and recent versions of Android, the app performs smoothly. What customers understand and the way they enjoy the app are your final benchmarks for overall performance.
Turn on the Profile GPU Rendering tool
Ensure that developer options is turned on, and allow USB Debugging if prompted.
Ensure that developer alternatives is became on, and permit USB Debugging if prompted.
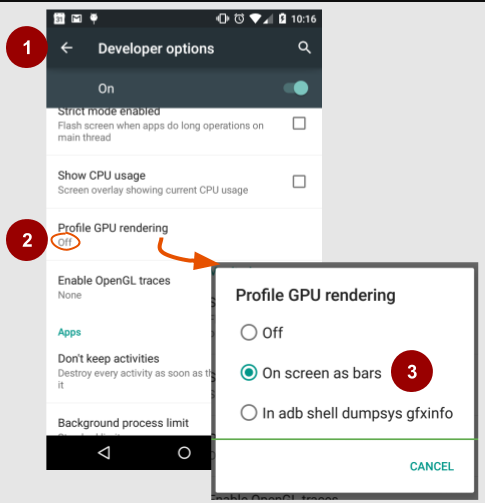
Go to Settings > Developer alternatives and comply with the stairs as illustrated in the screenshot under.
- Scroll all the way down to the Monitoring phase.
- Select Profile GPU rendering.
- Choose On display screen as bars in the conversation box. Immediately, you spot coloured bars in your display. The bars range relying for your tool and model of Android, so they may now not look precisely as illustrated.
Note the following:
- Each bar represents one body rendered.
- If a bar is going above the green line, the frame took more than 16ms to render. Ideally, most of the bars stay under the inexperienced line most of the time.
This is not an absolute requirement. For instance, while you first load an image, the bar may go above the inexperienced line, but customers may not be aware a trouble, because they will count on to wait a second for an photograph to load. Having a few tall bars does not suggest your app has a performance hassle. However, if your app does have a performance hassle, tall bars can provide you with a hint as to wherein to start looking.
- The colorings in each bar constitute the unique stages in rendering the frame. The colored sections visualize the tiers and their relative times. The desk underneath gives an explanation.
The picture under suggests the bars and colour legend for a tool that is running Android 6.Zero or higher. The bars for older variations use different coloring. See the Profile GPU Rendering Walkthrough for the bar legend for older versions.

The following table shows the component bars in Android 6.0 and higher.
| Rendering stage | Description |
| Swap buffers | Represents the time the CPU is waiting for the GPU to finish its work. If this part of the bar is tall, the app is doing too much work on the GPU. |
| Command issue | Represents the time spent by Android’s 2-D renderer as it issues commands to OpenGL to draw and redraw display lists. The height of this part of the bar is directly proportional to the sum of the time it takes for all the display lists to execute—more display lists equals a taller red segment of the bar. |
| Sync and upload | Represents the time it take to upload bitmap information to the GPU. If this part of the bar is tall, the app is taking considerable time loading large amounts of graphics. |
| Draw | Represents the time used to create and update the view’s display lists. If this part of the bar is tall, there may be a lot of custom view drawing, or a lot of work in onDraw methods. |
| Measure and layout | Represents the amount of time spent on onLayout and onMeasure callbacks in the view hierarchy. A large segment indicates that the view hierarchy is taking a long time to process. |
| Animation | Represents the time spent evaluating animators. If this part of the bar is tall, your app could be using a custom animator that’s not performing well, or unintended work is happening as a result of properties being updated. |
| Input handling | Represents the time that the app spent executing code inside of an input event callback. If this part of the bar is tall, the app is spending too much time processing user input. Consider offloading such processing to a different thread. |
| Misc. time / Vsync delay | Represents the time that the app spends executing operations between consecutive frames. It might indicate too much processing happening in the UI thread that could be offloaded to a different thread. (Vsync is a display option found in some 3-D apps.) |
For instance, if the inexperienced Input coping with part of the bar is tall, your app spends a variety of time handling input events, executing code called as a result of input occasion callbacks. To enhance this, consider while and how your app requests consumer input, and whether or not you could cope with it more effectively.
Note that RecyclerView scrolling can show up within the Input dealing with portion of the bar. RecyclerView scrolls right away while it methods the touch event. For this cause, processing the touch event needs to be as speedy as feasible.
If you spend time the use of the Profile GPU Rendering device in your app, it’s going to assist you become aware of which parts of the UI interplay are slower than anticipated, and then you may take motion to enhance the rate of your app’s UI.
Important:As the Android machine and gear improve, hints may exchange. Your high-quality and most updated supply of records on overall performance is the Android developer documentation.
Run the Profile GPU Rendering tool on an app with performance issues
Important:We do not want to train you how to write terrible apps. We do not even want to expose you the code. However, we are able to simulate a gradual app through using photos which might be too big; in a unique bankruptcy, you learn how to improve performance by using the use of the proper picture sizes and types to your app.
Create an app with image backgrounds
Build a LargeImages app that has performance problems. (You re-use this app in a later practical.)
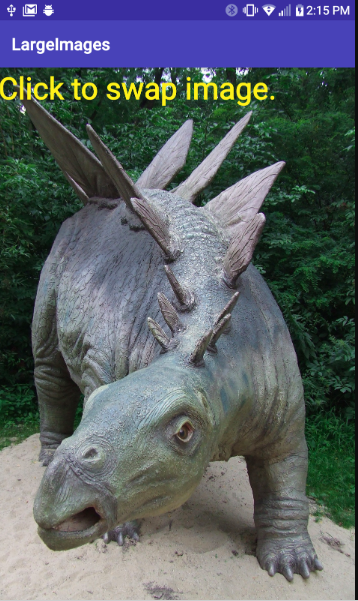
One way to put in force the LargeImages app is to expose simple instructions in a TextView and the big historical past picture that is provided with the answer code.
Do the following:
- Create an app named LargeImages the use of the Empty Template.
- Choose 5.1, Lollipop (API 22) as the minimal SDK. (Lossless and obvious WebP snap shots which you use later in this app are supported in Android 4.3, API stage 18 and higher, and API 22 is usually recommended.)
- Put at the least one small and one massive image into the drawables useful resource folder.
- You can reproduction pix from the answer code in GitHub.
- Small snap shots ought to be around 12KB.
- The largest photograph need to be some hundred KB. The dinosaur_medium.Jpg furnished with the answer code is 495KB and an amazing starting point. The max length of the photograph you can load depends on the amount of device memory to be had for your app. You can have a look at the specifications for a telephone version to find out how much RAM it has. Not all of this is to be had to a single app, so you may additionally must experiment a piece. You can also want to attempt one-of-a-kind length pics to discover the most important picture that won’t crash your app.
- Add an Activity.
- Create a layout with a LinearLayout with a TextView. Set the peak and width of the TextView to match_parent.
- Set the heritage (android:historical past) on the TextView to the small picture.
- Add this newsletter to this to the TextView: “Click to swap picture.”
- Add a click on handler to the TextView that modifications the background while the display screen is tapped. Use the following code snippet as a template. The code uses a numeric toggle so you can test with any quantity of images.
private int toggle = 0;
...
public void changeImage(View view){
if (toggle == 0) {
view.setBackgroundResource(R.drawable.dinosaur_medium);
toggle = 1;
} else {
view.setBackgroundResource(R.drawable.ankylo);
toggle = 0;
}
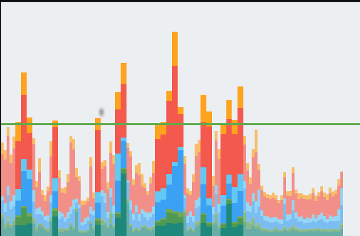
}Run the app with Profile GPU Rendering became on and tap to switch pix. When you load the small image, you ought to see incredibly short bars. When you load the huge picture, there must be exceptionally tall bars, much like the ones proven underneath.
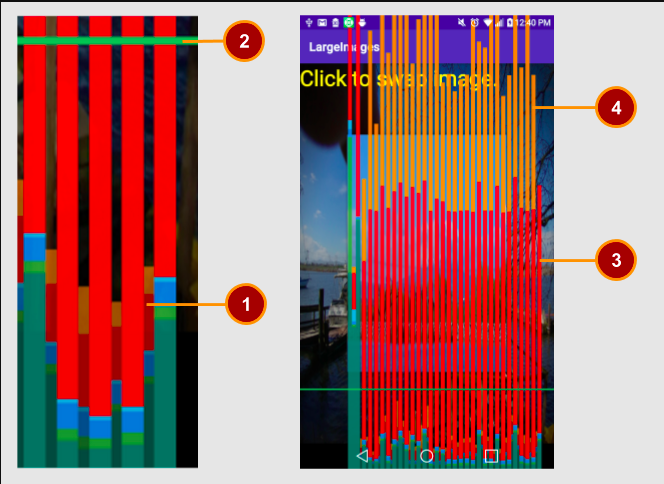
Profile GPU Rendering bars for the large photo app are proven inside the preceding screenshots. The element on the left indicates the faint short bars for the small photograph (1) staying under the green line (2). The screenshot on the proper show the bars as they seem in your tool emphasizing the bars that move the inexperienced line (three,4).
- The slender, faint bar for the small photo is below the green line, so there may be no performance difficulty.
- The green horizontal line indicates the 16 millisecond rendering time. Ideally, maximum bars must be near or below this line.
- After the small photograph is replaced with the aid of the big photograph, the pink bar phase is big. This Command issue section represents the time spent by using Android’s 2D renderer issuing instructions to draw and redraw show lists.
- The big photo additionally has a large orange segment. This Swap buffers phase represents the time the CPU is expecting the GPU to finish its work.
The GPU works in parallel with the CPU. The Android device issues draw commands to the GPU, and then moves on to its next undertaking. The GPU reads the ones draw instructions from a queue. When the CPU problems instructions quicker than the GPU consumes them, the queue between the processors becomes complete, and the CPU blocks. The CPU waits until there may be space in the queue to place the next command.
To mitigate this hassle, reduce the complexity of work taking place on the GPU, just like what you’ll do for the “Command difficulty” phase.
See Analyzing with Profile GPU Rendering for info on each degree.
To restoration the app, you would use a different or smaller photo. Finding problems can be as honest as this, or it is able to take additional evaluation to pinpoint what’s taking place for your app’s code.
Troubleshooting
- If your app crashes with the images provided for the pattern app, you can need to apply smaller images in your device.
- If your app crashes on the emulator, edit the emulator configuration inside the AVD Manager. Use your computer’s photographs card in preference to simulating the tool’s graphic software by selecting “Graphics: Hardware – GLES” at the configuration display screen.
- If you get a failed to find style ‘textviewstyle’ in modern topic or other rendering errors within the Design view in Android Studio, click the refresh hyperlink furnished with the error message.
Simulate long input processing
To demonstrate how doing too much work on the UI thread slows down your app, slow down drawing by putting the app to sleep:
- Add code to the press handler of the LargeImages app to permit your app sleep for two display refreshes earlier than switching the history to the smaller image. This approach that in preference to refreshing the display screen every sixteen ms, your app now refreshes every 48 ms with new content material. This could be contemplated within the bars displayed by the Profile GPU Rendering device.
public void changeImage(View view){
    if (toggle == 0) {
        view.setBackgroundResource(R.drawable.dinosaur_large);
        toggle = 1;
    } else {
        try {
            Thread.sleep(32); // two refreshes
        } catch (InterruptedException e) {
            e.printStackTrace();
        }
        view.setBackgroundResource(R.drawable.ankylo);
        toggle = 0;
    }
}- Run your app. The previously quick bars for the small image have to now be lots taller. Wait a while before clicking the TextView to get the subsequent image; otherwise, the Android machine might also display an ANR.
If your app is only swapping backgrounds, the effect from this modification won’t be great for the user. However, if you are running animated content, skipping two out of 3 frames will bring about a stuttering and jagged animation.
While Profile GPU Rendering cannot tell you precisely what to fix to your code, it may hint at wherein you must start looking. And allow’s admit it, the on-screen bars are pretty cool!
Summary
- You can use the Profile GPU Rendering tool on your tool to visualize the relative instances it takes on your app to render frames on screen.
- Because it may be became on speedy and its results are instantaneous and graphical, this device is a good first step while analyzing potential app overall performance problems related to rendering.
- The sections of the coloured bars can imply where on your app you might look for performance problems.
- Common reasons for slow drawing are an app taking too long to method consumer enter at the UI thread, and backgrounds and images that are useless or too large.