
GRID LAYOUT IN ANDROID for We are going to study Grid format and how it can be utilized in android utility development. If you are new to android format you could read a number of our previous tutorials on android linear and relative layout here.
Grid layout became delivered in API degree 14, and become backported inside the Support Library. Its most important reason is to resolve alignment and performance troubles in different layouts
Grid layout is especially used to align its infant perspectives in cells which might be the horizontal and vertical intercepts of an invisible line. Each view toddler is region in a cell and the cells are numbered with the horizontal and vertical indexes.
Throughout the API, grid strains are referenced via grid indices. A grid with N columns has N + 1 grid indices that run from zero thru N inclusive. Regardless of how Grid Layout is configured, grid index zero is fixed to the main edge of the container and grid index N is constant to its trailing edge (after padding is taken into consideration).
Grid format similar to different android layouts we’ve protected can be created programmatically or thru xml format. We are going to consciousness on the xml layout interface. If you want to study more approximately how you can create this format programmatically I will recommend you read our tutorial on Linear Layout in android.
grid-layout-in-android There are many residences or attributes of the Grid format we are able to emphasis on earlier than we move further to expose some examples on how to use a Grid format in android. One other vital fact to recognize is that Grid layout is not the same with GridView. GridView is a dimensional scrolling grid that makes use of facts from a list adapter. GridView is a sub-class of AdapterView.
Let’s have a look at how Grid layout positions its infant views. If a infant view in a Grid format does no longer specify its row and column indexes of the cellular it needs to take-up, the format will automatically assign a cellular to the view by means of the usage of the subsequent properties orientation, rowCount and ColumnCount.
The spacing among the cells or infant views can be carried out with using area view or layout margin parameters. The area elegance can be use in any cell or group of mobile. Another essential assets of the child view positioning in a cell is view gravity. The gravity of a view may be used to define the precise role you could need the view to appear or to fill all the available area in a mobile.
It is likewise feasible to span a row of cells to a special number of cells. This is likewise applicable to columns.
The following list under itemizes the specific attributes present in a Grid layout and what they can be used for.
Android:alignmentMode – When set to alignMargins, reasons alignment to take region between the outer boundary of a view, as defined by way of its margins.
Android:columnCount – The most wide variety of columns to create while robotically positioning kids.
Android:columnOrderPreserved – When set to true, forces column obstacles to appear within the equal order as column indices.
Android:orientation – The orientation belongings isn’t always used at some stage in layout.
Android:rowCount – The most wide variety of rows to create when mechanically positioning kids.
Android:rowOrderPreserved – When set to true, forces row barriers to appear in the equal order as row indices.
Android:useDefaultMargins – When set to proper, tells GridLayout to apply default margins while none are specified in a view’s layout parameters.
Now that we are a bit acquainted with Grid format, we will cross in advance and create a new mission so that it will exhibit actual lifestyles utilization of a Grid format in android. In this situation we’re going to create an android application task that makes use of a Grid layout to align its child perspectives in cells. We will also exhibit how we are able to put in force the distance and span residences within our code.
GRID LAYOUT IN ANDROID CREATE A NEW ANDROID PROJECT BY FOLLOWING THE STEPS LISTED BELOW.
Go to report menu
Click on New menu
Click on Android Application
Enter Project call: GridLayout
Package: com.Inducesmile.Gridlayout
Keep other default choices
Continue to click on on subsequent button until Finish button is active
Then click on on Finish Button
GRID LAYOUT IN ANDROID Once you’re executed along with your challenge, head over to the resource > layout folder and open the file called activity_main.Xml. In your IDE the graphical format view may be open. Click on the TextView on your format to choose it and click on on the delete button to delete the text from your format.
Now right click on to your format and choose trade layout and exchange the contemporary layout from Relative layout to Grid layout.
After you ought to have achieved with this your format code will appearance greater or less just like the code shown below. You can copy and paste this code to your activity_main.Xml document.
<GridLayout xmlns:android="http://schemas.android.com/apk/res/android"
    xmlns:tools="http://schemas.android.com/tools"
    android:id="@+id/GridLayout1"
    android:layout_width="wrap_content"
    android:layout_height="wrap_content"
    tools:context="com.inducesmile.gridlayouttutorial.MainActivity" >
</GridLayout>
GRID LAYOUT IN ANDROID ADD VIEWS TO GRID LAYOUT
Since we have created a skeleton of our Grid format, we’re going to upload child Views to our Grid format. In your IDE, this can be executed in special methods. We can either use the code view to edit our layout report or we are able to use the drag and drop graphical interface.
We will pass beforehand to add 5 button view controls in your layout. You can replace the code you have got in your activity_main.Xml document with the contemporary code below.
<GridLayout xmlns:android="http://schemas.android.com/apk/res/android"
    xmlns:tools="http://schemas.android.com/tools"
    android:id="@+id/GridLayout1"
    android:layout_width="wrap_content"
    android:layout_height="wrap_content"
    android:columnCount="3"
    android:rowCount="3"
    android:orientation="horizontal"
    tools:context="com.inducesmile.gridlayouttutorial.MainActivity" >
    <Space />

    <Button
        android:id="@+id/button1"
        android:layout_gravity="left|top"
        android:text="@string/button_name" />

    <Button
        android:id="@+id/button3"
        android:layout_gravity="left|top"
        android:text="@string/button_name" />

    <Button
        android:id="@+id/button2"
        android:layout_column="0"
        android:layout_gravity="left|top"
        android:layout_row="0"
        android:text="@string/button_name" />

    <Button
        android:id="@+id/button4"
        android:layout_column="0"
        android:layout_gravity="left|top"
        android:layout_row="2"
        android:text="@string/button_name" />

     <Button
        android:id="@+id/button5"
        android:layout_column="1"
        android:layout_row="2"
        android:layout_columnSpan="2"
        android:layout_gravity="fill"
        android:text="@string/button_name" />

</GridLayout>
The graphical presentation of the xml layout code is shown below.
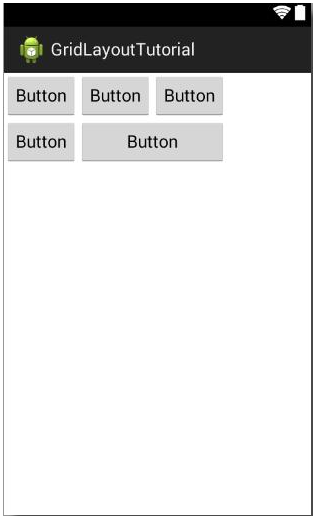
In the code above, we began off with a Grid layout as the basis View for our format document. Grid layout is a viewGroup and ViewGroup is a subclass of the View elegance.
Inside the Grid format, whilst you drag a child view into the Grid format, the IDE will atomically append a hallmark of the indexes that the view is presently sitting above. We have introduced 5 button views to our grid layout and the whole button Views are arranged in cells.
You will see that the fifth button uses the android:layout_columnSpan=”2″ to span another column and the android:layout_gravity=”fill” is used to fill the space made from spanning columns.
This brings us to the give up of this tutorial. You can run your application now. If everything works, your interface might be just like the picture displayed above.
Finally, when you have a question or inspiration kindly use our remark box. You can down load the supply code for this tutorial under.