
Important: CoffeeBot’s Web Server, The scripts supplied in this newsletter aren’t the encouraged example configurations because they have got actually no protection. Anyone in the international should technically request espresso or worse. We omitted security configurations / API keys, etc., to maintain the academic as easy as viable.
CoffeeBot’s Web Server,We want a way for clients to tell TurtleBot that they need coffee and manipulate the coffee queue if a couple of people want espresso concurrently. There are a couple of approaches to do this, however thinking about this collection is targeted at net developers, we’ll use a LAMP stack.
CoffeeBot’s Web,ServerWhat is LAMP?
CoffeeBot’s Web Server,LAMP is an acronym for Linux, Apache, MySQL and PHP. In different phrases, it consists of everything you want to run a web server and a database.
CoffeeBot’s Web Server,Creating a Web Server
CoffeeBot’s Web Server,You should create a nearby web server and have customers connect with that. But, instead of changing an existing laptop to an internet server, let’s spawn an example within the cloud.
Amazon web services (aka: “AWS”) gives loose micro-size Ubuntu net servers for 1 yr. You’ll want to type in your credit score card quantity but so long as you cancel within the first yr and don’t use extra sources than offered in their unfastened plan your card will not be charged.
If you don’t have already got an AWS account, click on “Create Free Account” in this page. Once you’ve completed signing up, click on “Launch Management Console”.
CoffeeBot’s Web Server,Creating Your CoffeeBot’s AWS Instance
- Log in to the AWS management console.
- Click “EC2″.
- Click “Launch Instance” button.
- Select “Ubuntu Server 14.04″. (Tip: This is the same distribution of Linux for your computer systems, so it need to act similarly.)
- Select “t2 micro”. (Tip: Make sure it says “loose tier eligible” so that you gained’t be charged.)
- Next: “Configure Instance Details”.
- “Review and Launch”.
- By default HTTP is off. Without this nobody can get entry to your server via a web browser.
- Under “Security Groups” click on “Edit Security Groups” and pick “Add Rule”.
- From the pulldown menu choose “HTTP”.
- Click “Review and release”.
- Select “Launch”.
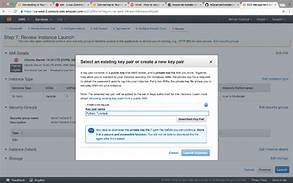
- A key pair will give you the credential report required to SSH into your server.
- Create a brand new key pair.
- Key pair call “turtlebot_new”
- “Download Key Pair”
- Save it for your downloads folder.
- Click “Launch Instances”.
- Select “View Instances”.
Determining Your Public DNS
Your instance’s public DNS is how your clients (and TurtleBot) will connect with the server. Let’s cross in advance and duplicate it for later use.
- Log in to the AWS management console.
- Click “EC2″.
- Click “Running Instances”.
- Select the checkbox to the left of the instance.
- The “Public DNS” cost is to be had at the lowest right.
Tips:We haven’t installed the LAMP stack in your server but, so in case you call the IP, nothing will manifest.
SSH in to AWS Instance
Important: We haven’t installed the LAMP stack in your server but, so in case you call the IP, nothing will manifest.
In a terminal window run the following:
cd ~/Downloads
chmod 400 turtlebot_new.pem
ssh -i turtlebot_new.pem ubuntu@[PUBLIC_DNS]
When it prompts:
Are you sure you want to continue connecting (yes/no)?Type yes.
CoffeeBot’s Web ServerInstalling the LAMP Stack
Shell (ssh) in to your server, then run the following commands:
sudo apt-get updateCoffeeBot’s Web ServerInstall Apache
sudo apt-get install apache2CoffeeBot’s Web ServerInstall MySQL
sudo apt-get install mysql-server php5-mysqlWhen prompted, set the root password of MySQL to “turtlebot”.
Tips:This is a terrible password, so feel loose to set it to every other price–however you’ll want to adjust the config.Php file cloned from github in a later step.
CoffeeBot’s Web ServerInstall PHP
sudo apt-get install php5 libapache2-mod-php5 php5-mcryptCoffeeBot’s Web Server,Give Ubuntu user rights to /var/www/
sudo adduser ubuntu www-data
sudo chown -R www-data:www-data /var/www
sudo chmod -R g+rw /var/www
start Apache
service apache2 stop
service apache2 startNOTE:In the video we attempted provider apache2 restart however this fails. Stop and begin succeeds.
Clone PHP files
cd /var/www/html
sudo apt-get install git
sudo git clone https://github.com/markwsilliman/turtlebot-server/
NOTE: In the video I first tried “git clone” without “sudo”; “sudo” is required.
Clone Web App
The web app is very similar to the browser extension however will allow your customers to request coffee immediately from their phone. We’ll discuss this in more element later, but for convenience permit’s go beforehand and clone it as nicely.
cd /var/www/html
sudo git clone https://github.com/markwsilliman/turtlebot-web-app/
(Optional) Set MySQL root password
If you didn’t set the MySQL root password to “turtlebot”, you want to edit the configuration document. If you probably did set the MySQL root password to “turtlebot”, skip this segment.
cd /var/www/html/turtlebot-server/
nano config.php
Scroll down to:
$a["password"] = "turtlebot"; //mysql passwordand update the value.
Then ctrl + x to exit and y to save.