
Beginner’s Guide, Conky is a graphical device which presentations gadget records to your display in actual time.
You can customize the Conky appearance and experience in order that it presentations the records you want it to.
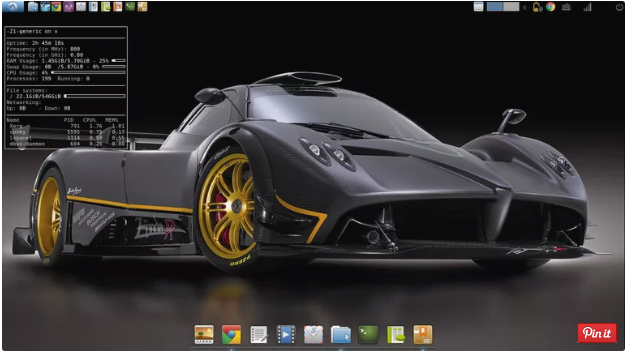
By default the form of data you may see is as follows:
- Computer Name
- Uptime
- Frequency (In MHz)
- Frequency (In GHz)
- RAM Usage
- SWAP Usage
- CPU Usage
- Processes / Running Processes
- File Systems
- Networking
- Top Running Processes
In this guide, we’ll show you how to install Conky and how to customize it.
Installing Conky
If you are using a Debian based Linux distribution inclusive of any of the Ubuntu own family. (Ubuntu, Ubuntu MATE, Ubuntu GNOME, Kubuntu, Xubuntu, Lubuntu etc).
Linux Mint, Bodhi and plenty of others then use the subsequent apt-get command:
sudo apt-get install conkyIf you are using Fedora or CentOS use the following yum command:
sudo yum install conkyFor openSUSE you would use the following zypper command:
sudo zypper install conkyFor Arch Linux user the following PacMan command:
sudo pacman -S conkyIn each of the cases above, we have included sudo to elevate your privileges.
Running Conky
You can run Conky directly from the terminal by using walking the following command:
conkyOn its very own, it is not excellent and you might locate the display sparkles.
To remove the sparkle run conky in the following ways:
conky -bTo get conky to run as a heritage manner use the following command:
conky -b &Getting Conky to run at startup differs for every Linux distribution.
This Ubuntu page shows a way to do it for the maximum famous Ubuntu editions.
Creating a Configuration File
By default the Conky configuration record is positioned in /etc/conky/conky.conf.
You must create your own configuration file.
To create a configuration document for Conky open a terminal window and navigate to your own home listing:
cd ~From there you now need to navigate to the hidden config folder.
cd .configYou could have simply typed (cd ~/.Config) in case you so needed.
Read our manual on the cd command for more facts approximately navigating the report machine.
Now which you are in the .config folder run the subsequent command to copy the default config document.
sudo cp /etc/conky/conky.conf .conkyrcBeginner’s Guide, Create a Script to Run Conky at Startup
Adding Conky by means of itself to the startup recurring for whichever distribution. And graphical laptop you are the usage of does not paintings very well.
You want to look forward to the computing device to absolutely load.
The excellent way to do this is to create a script to launch Conky and run the script at startup.
Open a terminal window and navigate to your home folder.
Create a record known as conkystartup.sh the use of nano or even the cat command. (If you so wish you may make it hidden by way of placing a dot in the front of the record call).
Enter those strains into the document:
#!/bin/bashsleep 10conky -b &Save the file and make it executable using the following command:
sudo chmod a+x ~/conkystartup.shNow upload the conkystartup.Sh script to the listing of startup packages in your distribution.
By default, Conky will now use your .Conkyrc document within the .Config folder.
You can, but, specify a unique config report if you so desire and that is beneficial. If you intend to run more than one Conky. (Perhaps 1 at the left side and 1 on the right).
First of all, create two Conky configuration documents as follows:
sudo cp /etc/conky/conky.conf ~/.config/.conkyleftrcsudo cp /etc/conky/conky.conf ~/.config/.conkyrightrcNow edit your conkystartup.sh and edit it as follows:
Save the document.
Now whilst your pc reboots you’ll have Conkys running.
You could have more than 2 walking however remember the fact that Conky will in itself be using assets.
And there is a limit to how lots machine statistics you will need to reveal.
Beginner’s Guide, Changing the Configuration Settings
To exchange the configuration settings edit the Conky configuration report you created within the .Config folder.
To do that open a terminal and run the subsequent command:
sudo nano ~/.config/.conkyrcScroll past the guarantee assertion till you spot the phrases conky.Config.
All the settings among the and within the conky.Config section defines how the window itself is drawn.
For example, to transport the Conky window to the bottom left you will set the alignment to ‘bottom_left’.
Going lower back to the concept of a left. And right Conky window you will set the alignment at the left config document to ‘top_left’. And the alignment on the right config report to ‘top_right’.
You can upload a border to the window with the aid of placing the border_width cost to any variety extra than zero.
And by way of placing the draw_borders option to proper.
To change the primary textual content color edit the default_color alternative and specify a colour inclusive of red, blue, green.
You can add an outline to the window by way of putting the draw_outline option to true.
You can exchange the define colour by means of amending the default_outline_colour alternative.
Beginner’s Guide, Again you would specify red, inexperienced, blue etc.
Similarly, you may upload a color through converting draw_shades to authentic.
You can then amend the coloration by using setting the default_shade_colour.
It is well worth gambling with those settings to get it to appearance the manner you like it.
Beginner’s Guide, You can trade the font fashion and size with the aid of amending the font parameter.
Enter the name of a font this is set up for your device and set the dimensions appropriately.
Beginner’s Guide, This is one of the most beneficial settings because the default 12 factor font is pretty huge.
If you want to depart an opening from the left aspect of the display edit the gap_x placing.
Similarly to exchange the position from the pinnacle of the display amend the gap_y placing.
Beginner’s Guide, There are a whole host of configuration settings for the window.
Here are a number of the most beneficial ones:
- Border_inner_margin – the margin among the border and the textual content
- border_outer_margin – the margin among the border and the edge of the window
- default_bar_height – the peak for bars (graph elements)
- default_bar_width – the width for bars (graph elements)
- default_gauge_height
- default_gauge_width
- draw_graph_borders – pick whether graphs have borders
- minimum_width – minimum width of the window
- maximum_width – maximum width of the window
- minimum_height – minimum peak of the window
- maximum_heigh – most top of the window
- own_window_title – Give the conky window a identify of your choosing
- own_window_argb_visual – activate transparency
- own_window_argb_value – wide variety among 0 and 255. 0 is opaque, 255 is completely obvious.
- Short_units – make units a single person
- show_graph_range – suggests the time variety blanketed by using a graph
- show_graph_scale – shows the maximum fee in scaled graphs
- uppercase – display all textual content in uppercase
Configuring the Information Shown by Conky
To amend the facts proven by Conky scroll beyond the conky.config section of the Conky configuration record.
You will see a phase which begins like this:
"conky.text = [["Beginner’s Guide, Anything you want to be displayed is going on this phase.
The traces within the textual content phase appearance something like this:
${color grey}Uptime:$color $uptimeThe coloration gray specifies that the word uptime will be gray in color.
Beginner’s Guide, You can exchange this to any coloration you desire.
The $color earlier than $uptime specifies that the uptime fee could be displayed inside the default coloration.
The $uptime putting will be replaced along with your device uptime.
You can scroll textual content via including the phrase scroll in front of the placing as follows:
${scroll 16 $nodename - $sysname $kernel on $machine |}You can add horizontal lines between settings by adding the following:
$hrHere are a number of the more useful settings which you would possibly want to add:
- audacious_bar – Audacious tune player progress bar
- audacious_channels – Number of audacious channels for modern music
- audacious_file – Filename for modern tune
- audacious_length – Length of present day music
- audacious_playlist_length – Number of tunes within the playlist
- battery_percent – Battery percentage
- battery_time – Battery time closing
- cpu – CPU usage
- cpubar – CPU bar chart
- cpugauge – CPU gauge
- desktop_name – Name of the desktop
- diskio (tool) – Displays disk io
- distribution – Name of the distribution
- downspeedf (net) – Download pace in kilobytes
- exec command – Executes a shell command and shows output in Conky
- fs_bar – How plenty space is used on a document machine
- fs_bar_free – How a whole lot loose space is available on a document gadget
- fs_free – Free area on a document machine
- fs_free_perc – Free area as a percentage
- picture – Displays an photo
- kernel – Kernel version3) – Load common for 1, five and 15 minutes
- mem – Amount of memory in use
- membar – Bar showing reminiscence in use
- memfree – Amount of free reminiscence
- memperc – Percentage of reminiscence in use
- mpd_album – Album in modern-day MPD song
- mpd_artist – Artist in current MPD song
- mpd_bar – Bar of mpd’s development
- mpd_file – Filename for modern-day mpd tune
- mpd_length – Song’s length
- mpd_title – Song’s call
- mpd_vol – Volume of MPD participant
- nodename – Hostname
- techniques – Total tactics
- running_processes – Processes in action
- change – Amount of swap area in use
- swapbar – Bar showing change usage
- swapfree – Amount of unfastened switch
- swapmax – Total amount of change
- swapperc – Percentage of switch in use
- threads – Total threads
- time (format) – Local time
- upspeedf – Upload velocity
- uptime – System uptime
- user_names – list the users logged in
- user_number – quantity of customers logged in
- user_times – period of time customers have been logged in
- utime – Time in UTC format
- climate – weather information