
Digital Ocean Server,Linux, Apache, MySQL & PHP on Ubuntu
Digital Ocean Server,Install LAMP on Ubuntu 18.04.2: Ubuntu is one of the most used server-side running structures. This is due to the convenience interface and it has many capabilities that may be carried out on the server facet too.
The “LAMP” stack is a collection of software that pre-established at the server to run the dynamic web apps on the server. The LAMP can be extended as “Linux, Apache, MySQL & PHP”. The Linux is the bottom operating machine software program, Apache is the net server which handles the request from inside and outside the server, MySQL is the database for the server & ultimately, The PHP is the programming language which the net apps based totally on the PHP language.
Digital Ocean Server,Install [LAMP] ,Prerequisites:
Digital Ocean Server,In this text, You will lean, how to installation the LAMP stack on Ubuntu 18.04.2 server through the grade by grade installing approach and by way of via the “one-click on app” installation method.
If you don’t have the Digital ocean account. Create the brand new Digital Ocean Account and get “a hundred$” unfastened credit to run net apps.
Digital Ocean Server,Install LAMP on Ubuntu 18.04.2 – Step by Step Method:
Just follow the under steps to install the LAMP stack in Ubuntu 18.04.2 server.
Install Ubuntu 18.04.2 on Digital Ocean:
Follow the object to down load and deploy ubuntu 18.04.2 on Digital Ocean server.
Digital Ocean Server,Install [LAMP] ,Install Apache Web Server:
The Apache net server is one of the maximum generally used servers inside the global. This server is extra reliability and so maximum of the internet apps the use of Apache as the net server.
Install Apache from Ubuntu’s Package manager:
sudo apt updatesudo apt install apache2Type the code in console of your server and click on enter button. It will ask you the server password and now “Enter” the password to maintain the installation. Now it will ask you query sonsuming the space of your server and press “Y” & click “Enter” button.
Install [LAMP] ,The set up system will start and the Apache server will mounted to your PC.
Digital Ocean Server,Modifying the Firewall to allow Web Traffic:
You want to observe the underneath instructions to allow the UFW firewall. This UFW firewall will permit the traffic from HTTP & HTTPS request.
sudo ufw app listInstall [LAMP] ,If you input the above command, you will get the subsequent output.
Available applications:

Apache Apache Full

Apache Secure

OpenSSH
The “Apache Full” profile will enables the site visitors from 443 & eighty ports.
sudo ufw app info “Apache Full”
The output will be:
Profile: Apache Full

Title: Web Server (HTTP,HTTPS)

Description: Apache v2 is the next generation of the omnipresent Apache web server.

Ports: 80,443/tcp
Now you need to enable the incoming visitors via the port eighty & 433.
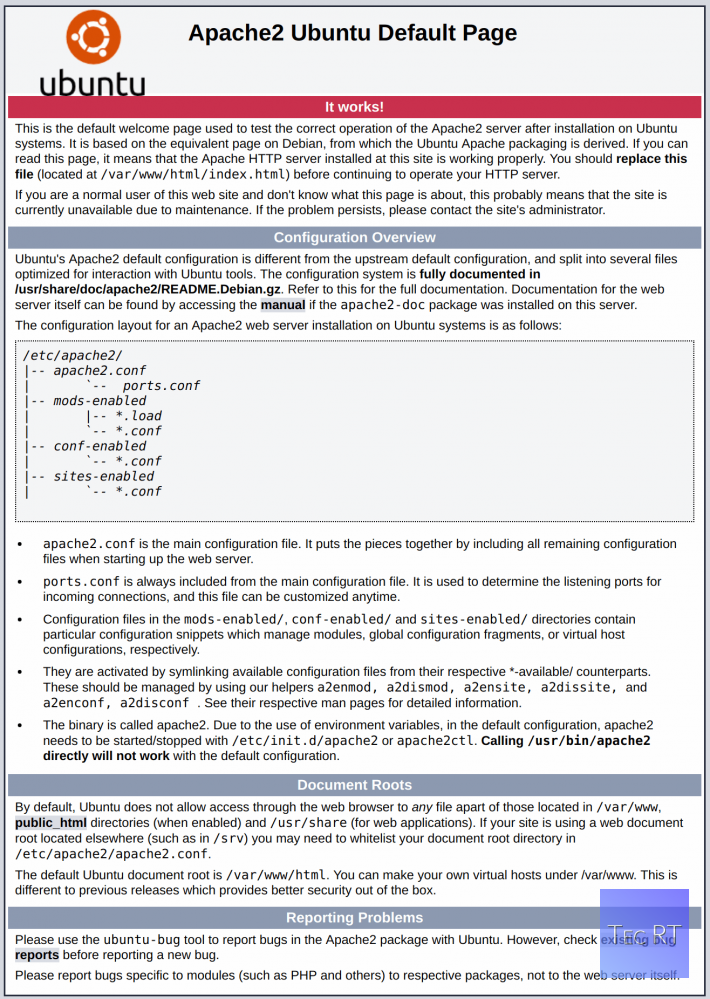
sudo ufw allow in “Apache Full”That’s it, The Apache internet server has been mounted on your server. To test this, you want to go into the IP deal with of your server inside the browser as shown in beneath:
http:// Your IP AddressYou will capable of see the Apache Default web page in your IP address on the browser.
Digital Ocean Server,Installing MySQL Database:
You have efficaciously mounted the Ubuntu 18.04.2 & Apache internet server. Now it’s the time to put in MySQL database for your server. Follow the beneath commands to install the MySQL database. The MySQL is especially used to save the facts supplied via the person at the server.
sudo apt install mysql-serverThe above command will installation the listing of applications related to the MySQL and it’ll devour a few space on your server. You want to go into “Y” and hit the “Enter” button.
sudo mysql_secure_installationIf you enable this option, The MySQL will rejects the request from wrong password. So you want to be clean whilst entering the password and don’t forgot, keep it a few where else domestically. Please input the sturdy password.
Enter “Y” and hit the “Enter” button.
VALIDATE PASSWORD PLUGIN may be used to check passwords and enhance protection. It tests the energy of the password and permits the customers to set most effective those passwords which are comfy enough.

Would you likeY for Yes, every other key for No:

Press yanother key for No:
Now, you will be asked to enter the password level
There are three levels of password validation policy:

LOW Length >= 8
MEDIUM Length >= 8, numeric, mixed case, and special characters
STRONG Length >= 8, numeric, mixed case, special characters, and dictionary file

Please enter 0 = LOW, 1 = MEDIUM and 2 = STRONG: 1
Despite whether or not you chose a “Validate Password Plugin“, You MySQL server will ask you approximately confirming the password that you entered. This is the superuser or administrative account and so you will have the improved privileges. Don’t forget about to pick out the Strong Password to the MySQL login.
Due to the “Validate password Plugin”, Your password power might be proven on your screen. Now click input button, you’ll be asked to “exchange the password”. If you are inclined to exchange the password press “Y” and input the brand new password otherwise, press “N” and click on Enter button to continue.
You will be asked extra query in this setup, you could skip all the questions by way of coming into “Y” & hit “Enter” button for every activates.
Then sooner or later enter the below code to go out the MySQL.
mysql> exit

Note: Don’t copy the “mysql>“. Just type “exit” & hit Enter button.
Installing PHP on the server:
PHP is gambling the important position in server side compiling the codes. This will technique your codes and shows into dynamic content material. This PHP has plenty of libraries and so that you can capable of run massive range scripts, codes and extra. You can without difficulty join the MySQL Database with PHP and so you will be capable of create dynamic web apps with MySQL database.
Just observe the stairs to install the PHP:
sudo apt install php libapache2-mod-php php-mysqlThe PHP will deploy for your server. But before checking it, we need to do extra steps to install the PHP to your server.
Usually, Apache will search for a file “index.Html”. Here we want to exchange the file as “index.Php”, so the Apache will search for “PHP” files on your server. We are not getting rid of the record but converting the concern of the document extension. Due to this, Apache will search for index.Hypertext Preprocessor initially, if the report wasn’t gift the Apache will search for index.Html one.
To do this, comply with the beneath command:
sudo nano /etc/apache2/mods-enabled/dir.confThe above code will assist you to edit the Apache Directory with super user previliges.
The output will seem like this:
<IfModule mod_dir.c>
DirectoryIndex index.html index.cgi index.pl index.php index.xhtml index.htm
</IfModule>
Just alternate the exntension from “index.Html to index.Hypertext Preprocessor” inside the first and trade the “index.Personal home page to index.Html” within the fourth one. After changing, it’s going to appear to be the under one:
<IfModule mod_dir.c>
DirectoryIndex index.php index.html index.cgi index.pl index.xhtml index.htm
</IfModule>
Now, Apache will look for the Index.Hypertext Preprocessor record. Don’t neglect to store the record.
Now you ought to need to restart the Apache server to update the modifications which you had achieved. Follow the under command to restart the Apache Server.
sudo systemctl restart apache2If executed whatever incorrect in modifying the directory, the Apache will throw you the error and it’ll now not begin. You can take a look at the reputation of the Apache server via entering the under command.
sudo systemctl status apache2Now, the fame of the Apache for your server will seem to your display screen. We added the sample output on your explanation.
Sample Output:

● apache2.service – LSB: Apache2 web server
Loaded: loaded (/etc/init.d/apache2; bad; vendor preset: enabled)
Drop-In: /lib/systemd/system/apache2.service.d
└─apache2-systemd.conf
Active: active (running) since Tue 2018-04-23 14:28:43 EDT; 45s ago
Docs: man:systemd-sysv-generator(8)
Process: 13581 ExecStop=/etc/init.d/apache2 stop (code=exited, status=0/SUCCESS)
Process: 13605 ExecStart=/etc/init.d/apache2 start (code=exited, status=0/SUCCESS)
Tasks: 6 (limit: 512)
CGroup: /system.slice/apache2.service
├─13623 /usr/sbin/apache2 -k start
├─13626 /usr/sbin/apache2 -k start
├─13627 /usr/sbin/apache2 -k start
├─13628 /usr/sbin/apache2 -k start
├─13629 /usr/sbin/apache2 -k start
└─13630 /usr/sbin/apache2 -k start
Enter “Q” to exit this reputation display. If you get the above sample output for your screen then you have sucessfully configured the Apache server with PHP.
Now you want to install the PHP clients, “CURL” is one the excellent PHP customer. It is particularly used to sending and receiving the request from the server.
sudo apt install php-cliA list of packages will appear on the screen, from this you need to select the package deal and installation it on your server.
sudo apt install package_nameThat’s it, You have effectively installed the LAMP Stack for your Web server. Before making any modifications, we request you to take a backup of your server. Now it is simply to test the PHP on your net server.
Testing the PHP & Apache on your server:
“Php Info” is the simple technique to confirm the PHP & Apache functioning on the net server. Creating a simple script will show you the entire info of your servers PHP version & Apache server information.
To create the dynamic internet app files in Ubuntu 18.04.2, You just need to get right of entry to the “Web Root” folder. Which is presented in “/var/www/html/” area.
sudo nano /var/www/html/info.phpThe above code will create a brand new report within the root folder and now copy the beneath code and paste for your server console.
                                 info.php

<?php
phpinfo();
?>
After pasting the codes, store and stop.
To affirm your server, you need to open the under URL in your browser.
http://ip_address_of_your_server/info.php
Note: Replace “ip_address_of_your_server” with your server IP Address
Now, inside the browser, you may be capable of see the beneath photographs that seem on your screen.
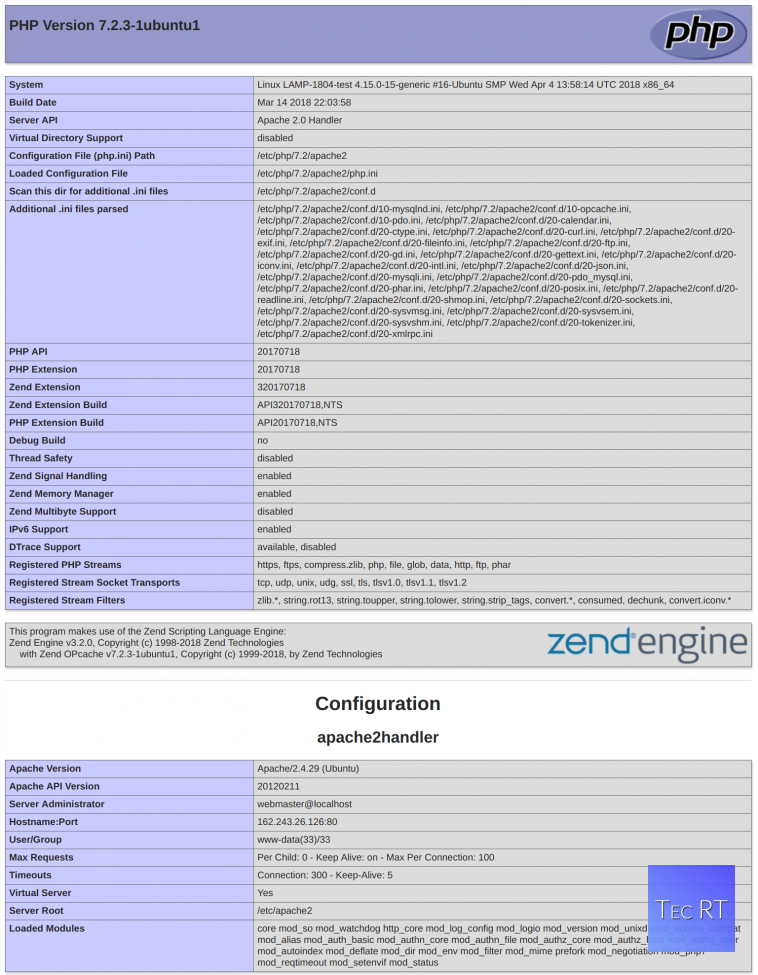
If the above photo seems at the screen, Then the PHP and Apache are successfully mounted in your web server. You can begin importing your dynamic net apps into the root folder thru the FTP and don’t overlook to delete the PHP data page.
You can delete the PHP data page by means of getting into the underneath command,
sudo rm /var/www/html/info.phpThat’s it, parents, By following the above article, you’ll capable of installation the LAMP stack from the scratch to your web server.
Install LAMP on Ubuntu 18.04.2 – One-Click App Method:
Think approximately this, Deploying server with pre-set up LAMP stack! How cool it is, proper. Digital Ocean made the complete technique very easily by way of introducing the One Click Apps. The One Click Apps are the characteristic furnished through the Digital Ocean, which helps you to set up the server with Pre-hooked up LAMP stack.
Follow the beneath steps to deploy a server with Pre-hooked up LAMP Stack.
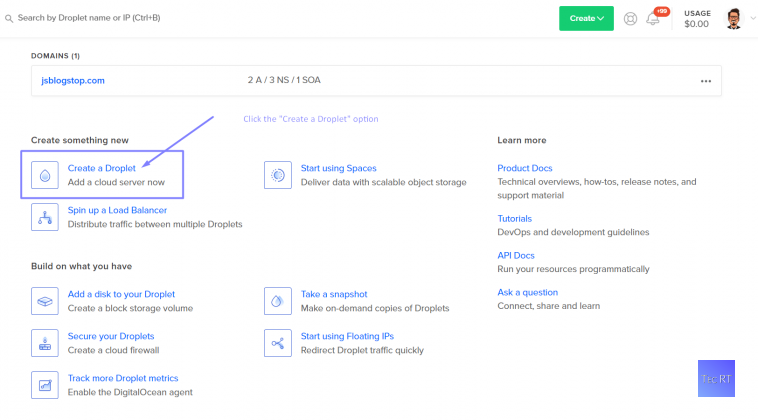
- Login to your Digital Ocean account
- Click the “Create a Droplet” alternative
- Now, go to the Marketplace Tab
- This Marketplace tab is as soon as referred to as as the One-click on apps
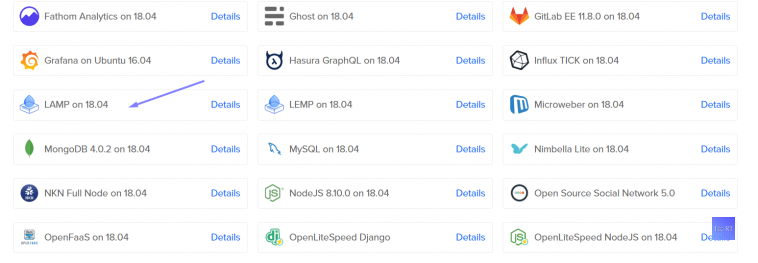
- Here, you’ll able to see the listing apps which can be to be had as the pre-set up apps
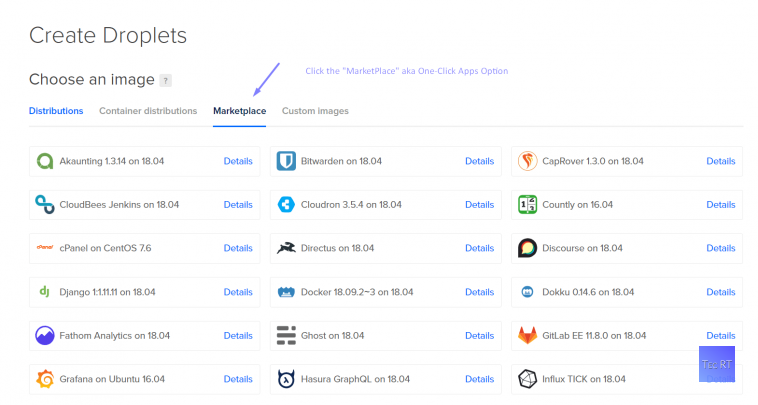
- Go for “LAMP” stack and scroll down
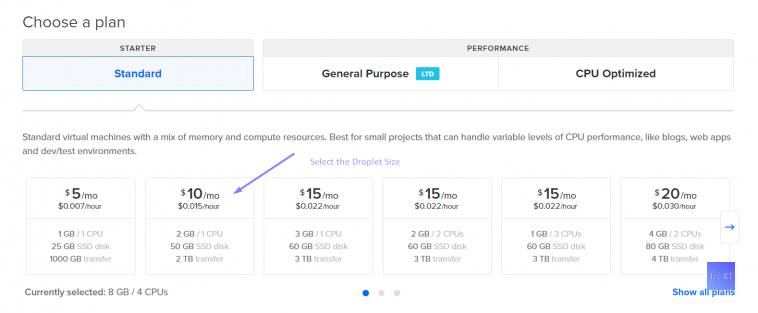
- Choose the plan of your web server
- For small dynamic websites, we propose you go with “Standard” plans.
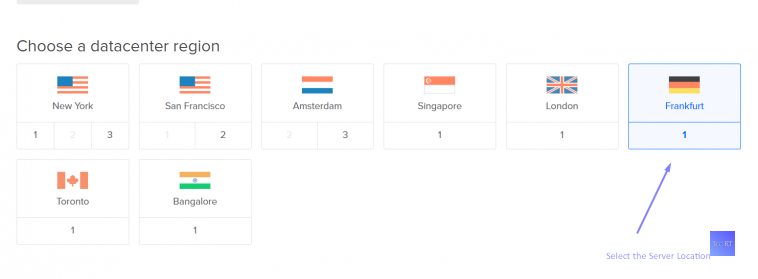
- Select the location of your server and scroll down
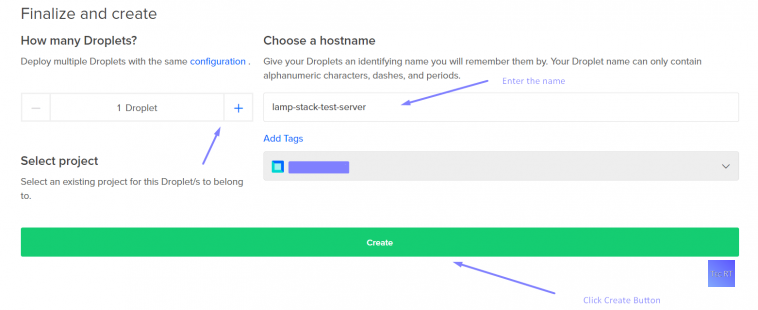
- Enter the call of the droplet, pick the range of droplets which you need to create at this instance & ultimately click the Green coloured button named as “Create” will installation the server with the pre-established LAMP stack.
That’s it, friends, This is the perfect manner to installation the LAMP stack server. We suggest you use the Marketplace to set up the server. Lesser time eating and error unfastened.
Install [LAMP] ,Verdict:
Basically, you have hooked up the platform for your server. Still, you need to do more paintings to transform into dynamic net apps. We always suggest you create the LAMP stack via the Marketplace method than the traditional one. The Conventional one is the maximum particular one but a time-ingesting one. The one click on app method is fixed one however lesser timing. The preference is yours.