
Create a Multiboot USB Drive, This guide will show you how to deploy multiple running structures onto a single USB power.
There are many motives why you might need to try this. If you’ll use Linux on a powerful laptop then you definately may use Ubuntu or Linux Mint. This educational will train you the way to create a multiboot Linux USB force the usage of Linux. However, if you are using a much less effective computer you may want to use Lubuntu or Q4OS.
By having multiple Linux distribution set up on a USB drive you can have Linux available to you wherever you cross.
This manual assumes you are using the Windows operating device to create the USB pressure and the tool this is highlighted calls for Windows 7, 8, 8.1 or 10.
Create a Multiboot USB Drive, Introducing the YUMI Multiboot Creator
Create a Multiboot USB Drive, In order to create the USB drive, you will need to put in YUMI. YUMI is a multiboot USB creator and, in case you aren’t familiar with it, you ought to read up on YUMI earlier than continuing.
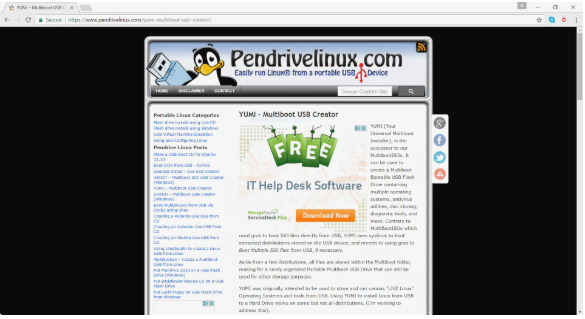
Create a Multiboot USB Drive, Get the YUMI Multiboot USB Creator
01 Open your net browser and visit the YUMI multiboot USB creator download web page.
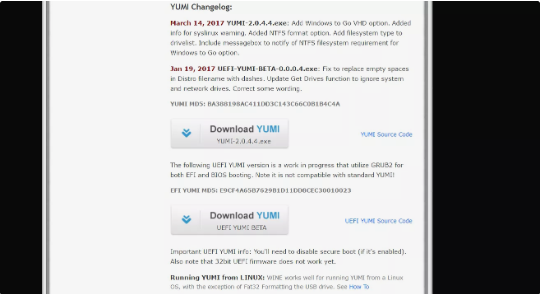
02 Scroll down the web page till you see Download YUMI. There will be two links there. You can select to down load both model, however, going for the UEFI YUMI Beta model might also yield the first-rate results, regardless of it having the phrase “beta” in it.
Create a Multiboot USB Drive, Beta commonly manner that the software is not fully tested but however, in this situation, it works thoroughly and it’ll let you run the Linux distributions you install to the USB force on all computers while not having to replace to legacy mode.
Most modern computers now have UEFI (Unified Extensible Firmware Interface) as opposed to the antique college BIOS (Basic Input Output System).
Therefore for the great results pick Download YUMI (UEFI YUMI BETA).
03 The download will take a few minutes to complete, relying upon your connection. When it is performed, you’ll be prepared to put in and set up YUMI.
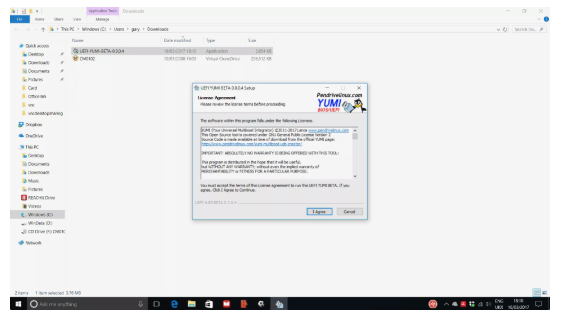
Create a Multiboot USB Drive, Install and Run YUMI
Now that you have the YUMI installer, you could run it to install YUMI on your machine. From there, you may be capable of creating your multi-boot USB.
01 Insert a lately reformatted USB force or one with none vital information on it. You will lose everything at the USB, so ensure which you make backups first.
02 Open Windows Explorer and navigate in your downloads folder.
03 Locate and run your recently downloaded UEFI-YUMI-BETA.Exe file.
04 A new window will pop open and display the YUMI license agreement. Select I Agree to maintain.
05 You must now see the principle YUMI display
Create a Multiboot USB Drive, Add the First Operating System to the USB Drive
The YUMI interface is fairly simple however let’s undergo the steps to including the first operating gadget to the USB force.
01 Select the drop-down menu underneath Step 1 and pick out the USB power where you desire to install the operating device.
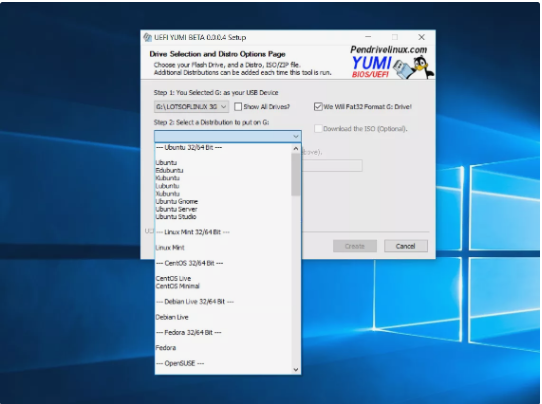
02 If you cannot see your USB force area a test Show All Drives and select the drop down once more and choose your USB power.
03 Select the subsequent listing under Step 2 and scroll thru the listing to find the Linux distribution or the Windows Installer must you wish to install.
04 If you don’t already have the ISO photograph downloaded pick out Download the ISO (Optional) as nicely.
05 If you have already downloaded the ISO image of the Linux distribution you want to pick out Browse and navigate to the location of the ISO picture of the distribution you desire to add.
06 If the pressure isn’t always empty you will need to layout the power. Select Format pressure (Erase all content).
07 Finally, pick out Create to add the distribution.
Install the First Distribution
With the primary distribution queued up and equipped to head, you are ready to continue on to virtually putting in the distribution to your USB pressure.
01 A message will appear telling you precisely what will manifest in case you pick out to keep. The message tells you whether or not the drive may be formatted, a boot document may be written, a label might be introduced and the running system will be established.
Select Yes to start the set up method.
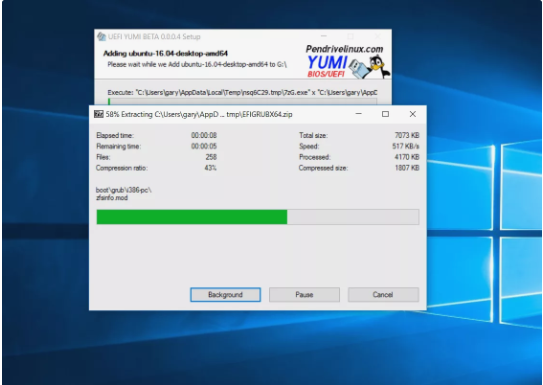
02 What occurs next depends on whether you chose to down load the distribution or installation from a pre-downloaded ISO photograph.
If you selected to down load then you will ought to look forward to the down load to complete earlier than the documents are extracted to the force.
If you selected to put in an already downloaded ISO photo then this report may be copied to the USB drive and extracted.
When the procedure has completed choose Next to continue.
03 A message will appear asking whether or not you want to add extra running systems. If you do, press Yes.
Add More Operating Systems to the USB Drive
To upload a 2d working machine to the pressure you comply with the identical steps as before except you should no longer pick out Format force, or you will lose the first operating system, and that’s a major waste of time.
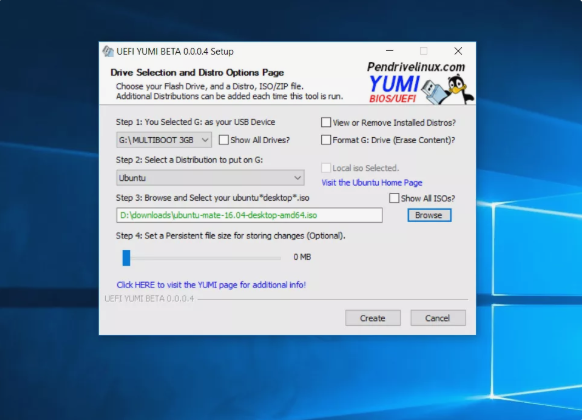
Refer to the stairs for the primary OS, if you need a refresher. Remember that this is precisely the identical, store for formatting the force. There are multiple extra options that you need to additionally be privy to this time, even though.
Show all ISOs will can help you see all ISO pix while you select Browse and not just the ISOs for the running structures you could pick out inside the dropdown list.
Under Step 4 you can drag a slider alongside to set a place of persistence. This will can help you keep adjustments to the running structures you put in to the USB power. The slider controls how a good deal pressure space the working device has to paintings with at the USB.
By default, that is set to nothing and therefore anything you do within the working systems on the USB power can be misplaced and reset the subsequent time you reboot.
Note: It takes a bit longer to procedure the staying power record as it creates an area on the USB drive ready to keep records
To preserve including the second one distribution, Create once more.
You can keep adding increasingly operating systems to the USB power until you’ve got as many as you want or certainly you run out of the area.
How to Remove Operating Systems from the USB Drive
YUMI gives you the ability to put off working structures that you’ve set up to your USB pressure. This manner, you may truly change out an OS that you are not using anymore for a more modern version or something completely different.
1 Insert your USB pressure into your computer once more.
2 Launch YUMI.
3 In YUMI, choose View or Remove Installed Distros to access a listing of distributions in your USB.
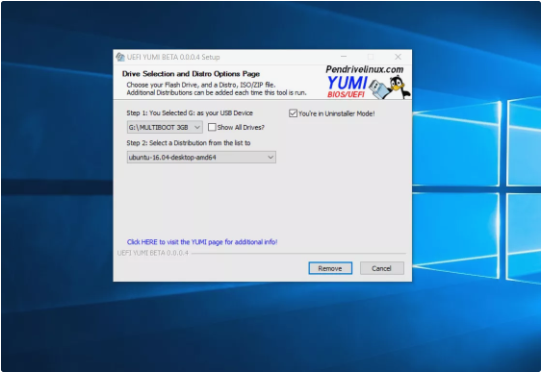
4 Select your USB force from the listing in Step 1
5 Select the operating device you want to get rid of from Step 2.
6 When you are equipped, pick out Remove to uninstall the running machine.
How to Boot Using the USB Drive
To use your USB power ensure that it’s far plugged into the pc and reboot your pc.
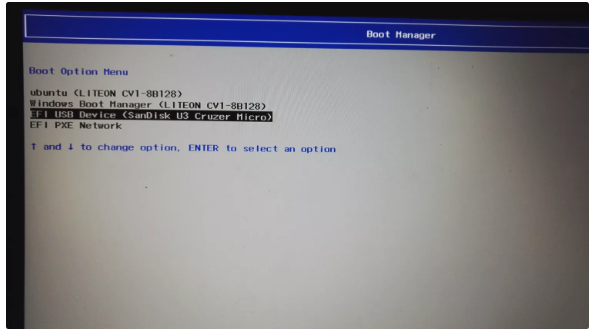
When the gadget first begins, press the applicable characteristic key to enter the boot menu. The relevant key differs from one manufacturer to every other. The list beneath need to assist:
- Acer – Esc, F9, F12
- ASUS – Esc, F8
- Compaq – Esc, F9
- Dell – F12
- EMachines – F12
- HP – Esc, F9
- Intel – F10
- Lenovo – F8, F10, F12
- NEC – F5
- Packard Bell – F8
- Samsung – Esc, F12
- Sony – F11, F12
- Toshiba – F12
If your laptop manufacturer doesn’t appear inside the list attempt the use of Google to look for the boot menu key by way of typing (producer’s name boot menu key) into the quest bar.
You also can strive urgent ESC, F2, F12, and so on whilst booting. Sooner or later the menu will seem and it’ll look similar to the only above.
When the menu seems, use the down arrow to choose your USB force and press input.
Choose Your Operating System
Once you’ve decided on your USB as the boot tool, the YUMI boot menu has to now seem.
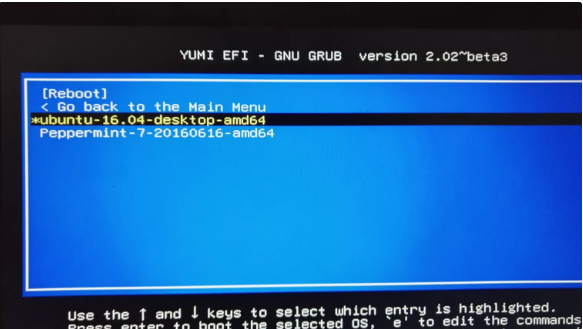
The first display screen asks whether you want to reboot your laptop or view the operating systems you have set up at the force.
If you pick to view the working systems you’ve got installed to the pressure then you’ll see a list of all of the running structures you have got hooked up.
You can boot to the operating machine of your desire by using using the up and down arrows to select the preferred item and the input key to boot into it.
The running machine you’ve got decided on will now boot and you can begin the usage of it typically.