
Steam is an extraordinary help for purchasing and classifying all your PC games. In the event that you have most loved games, you should stick them to your Windows 10 taskbar or somewhere else, similar to your work area or Start menu, for simple access.
Be that as it may, Steam alternate ways work in an exceptional way. They are web joins, which implies that on the off chance that you need to stick Steam games or add Steam games to your taskbar then you have to follow these techniques
Step by step instructions to Pin Games in Steam
On the off chance that you have an immense assortment of Steam games, it’s helpful to stick games so you can discover and play them rapidly. The most ideal approach to do this inside the Steam customer is to utilize the top picks highlight.
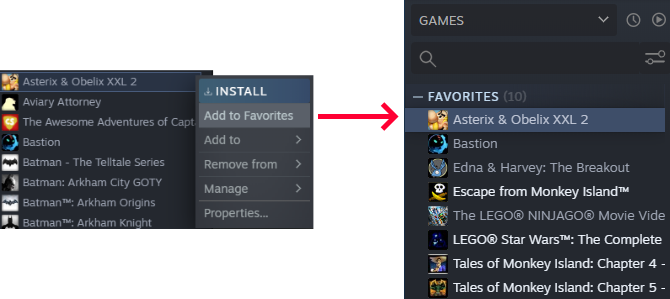
Open Steam and change to the Library area. A rundown of every one of your games shows up on the left. Right snap the game you need to stick and snap Add to Favorites.
This will make another class at the top called Favorites. You can include the same number of games as you like into this classification. Likewise, you can make custom classifications in Steam, however the Favorites classification will consistently show up at the top.
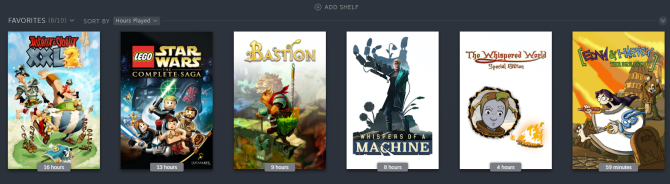
you can include the Favorites classification as a “rack” on the principle sheet. This is a bigger visual portrayal of the games utilizing their container craftsmanship. You can sort this rack utilizing the Sort by dropdown. This has alternatives like Alphabetical, Hours played, and Release date.
Step by step instructions to Pin Steam Games to the Windows 10 Desktop
You can add an easy route to a Steam game legitimately to your Windows 10 work area. The game will at present open utilizing Steam, yet it spares you stacking the customer first.
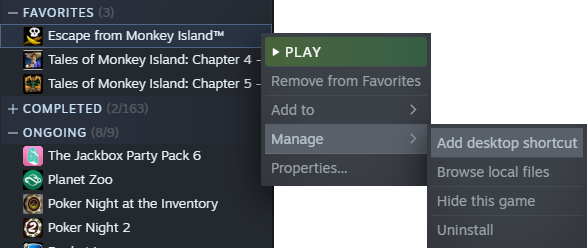
To do this, open Steam and go to the Library area. Right snap the game that you need to put on your work area and snap Manage > Add work area alternate route.
The most effective method to Pin Steam Games to the Windows 10 Taskbar and Start Menu
There are two or three different ways to stick a Steam game to the taskbar and Start menu in Windows 10. You can put the Steam customer on the taskbar or Start menu and pin your game in the setting menu. On the other hand, you can stick the game as a different element.
Pin the Steam Client to the Windows 10 Taskbar or Start Menu
To stick the Steam customer to your taskbar or Start menu, open Start and type steam. This will discover the Steam application. Right snap the outcome and snap Pin to taskbar or Pin to begin. The Steam alternate way will be added to your picked area, which you can snap to dispatch Steam.
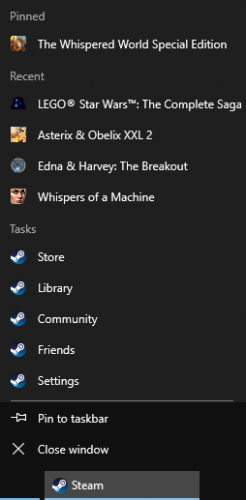
We can make this one stride further. Right snap the Steam symbol in the taskbar or Start menu and it will open the setting menu. Here you can go directly to segments like the Store or Library.
At the top are the five games you collaborated with as of late. Float more than one and a pin symbol will show up. Snap the pin symbol in the event that you need to for all time place that game inside another Pinned classification at the head of the setting menu.
On the off chance that the game you need to nail isn’t to the Recent rundown, no issue. You could dispatch it quickly with the goal that it shows up. Then again, for the taskbar just, adhere to the guidelines above to put the game’s alternate route on your work area. At that point, snap and drag the symbol to your taskbar. It will at that point be stuck to the Steam setting menu.
Pin a Steam Game to the Windows 10 Taskbar or Start Menu
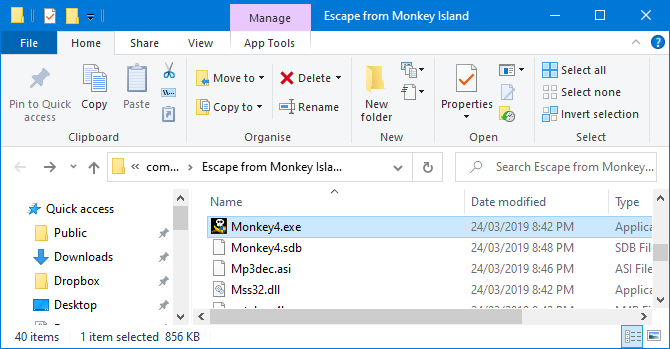
You can stick the individual game to your taskbar or Start menu. To do this, open Steam and go to the Library tab. Right snap the game you need to stick and snap Manage > Browse nearby documents.
This will open File Explorer and take you directly to the game’s establishment records. In here there ought to be an application document with the expansion EXE. This is what is utilized to dispatch the game. On the off chance that you don’t see it, look in the subfolders.
At the point when you’ve found the EXE record, right snap it and snap Pin to taskbar or Pin to begin.
Pin a Steam Game to the Windows 10 Start Menu with Live Tiles
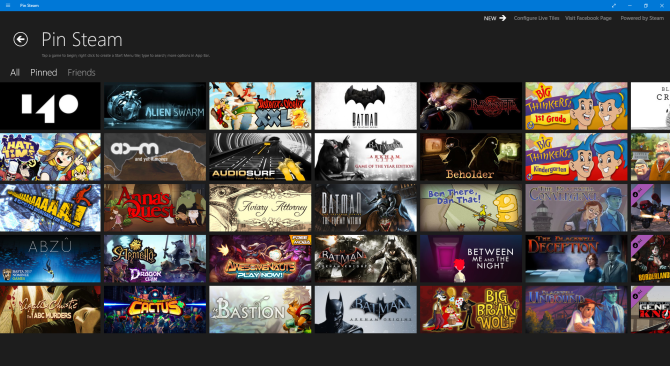
For the Start menu, you can get fancier looking tiles utilizing a free Microsoft Store application called Pin Steam. Just download and dispatch the application. At that point input the custom piece of your Steam profile URL when incited. Your profile should be open for this to work.
In the event that you don’t have a custom URL, or your profile is private, you have to make a couple of changes. To do this, open Steam, drift your username in the top menu, and snap Profile. At that point click Edit profile on the right.
To begin with, set a Custom URL. Next, change to the My Privacy Settings tab and set Game subtleties to Public. You can slow down your profile to private once you’ve finished the sync to the Pin Steam application.
When you have the Pin Steam application all associated, it will show a matrix of your games. Snap the ones you need to add to your Start menu thusly, at that point click Quick Pin.
On the other hand, click Create Tile to alter explicit settings for the tile, similar to the text style shading. When these tiles are on your Start menu, you can right snap and Resize to little, medium, or enormous.
The incredible thing about Pin Steam is that it makes live tiles. This implies the Start tiles will show when your companions are playing the game. You can likewise stick companions as a Start tile, on the off chance that you need to tail them.
For more assistance making Windows 10 Start tiles, look at our guide on the best way to make custom Start tiles.
Let Steam Decide Your Next Game
Presently you realize how to stick your preferred Steam games all over Windows—regardless of whether it’s in the Steam customer itself, or as an alternate way on the work area, taskbar, and Start menu.