

Harden Ubuntu Server 18.04, Linux is well known for being one of the most comfy working structures to be had. That doesn’t mean, out of the field, you could count on it to be as comfy as feasible.
In reality, there are some quick steps you can take to make certain your platform is even more at ease.
Here are five tasks to take care of on a freshly-installed Ubuntu Server 18.04 platform.
Harden Ubuntu Server 18.04, Secure Shared Memory
Harden Ubuntu Server 18.04, One of the primary things you must do is comfy the shared memory used on the device.
If you’re unaware, shared reminiscence may be utilized in an assault in opposition to a walking carrier.
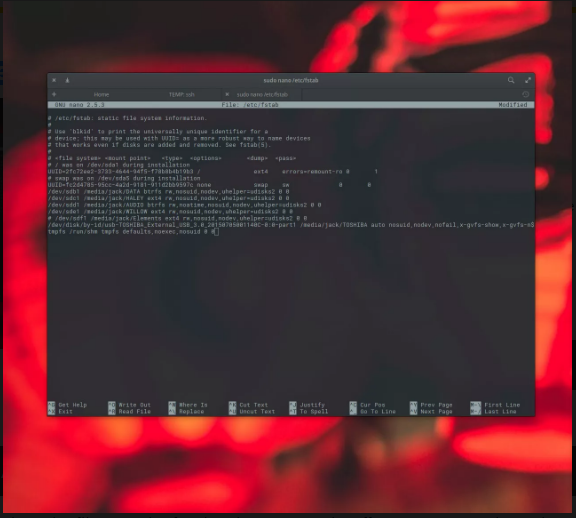
Because of this, you’ll want to comfortable that part of machine memory. You can try this by enhancing the /etc/fstab file.
First, you need to open the document for editing via issuing the command:
sudo nano /etc/fstabNext, add the following line to the bottom of that file:
tmpfs /run/shm tmpfs defaults,noexec,nosuid 0 0Save and close the record. In order for the adjustments to take effect, you ought to reboot the server with the command:
sudo rebootHarden Ubuntu Server 18.04,Enable SSH Login For Specific Users Only
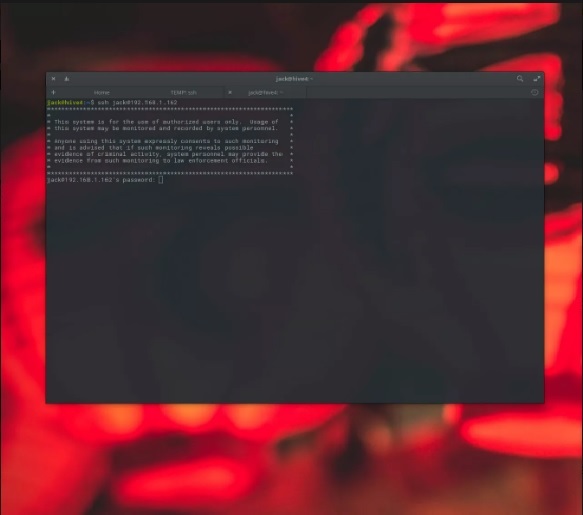
Harden Ubuntu Server 18.04, Secure Shell (SSH) is the tool you’ll use to log into your remote Linux servers.
Although SSH is fairly at ease, by default, you may make it even more so, by enabling SSH login only for specific customers.
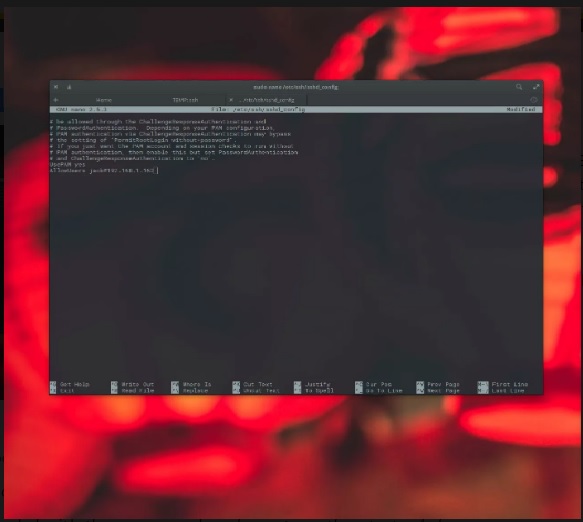
Let’s say you want to only permit SSH entry for the person jack, from IP deal with 192.168.1.162. Here’s how you would try this.
Open a terminal window. Open the ssh config document for enhancing with the command sudo nano /and so forth/ssh/sshd_config. At the lowest of the record, add the road AllowUsers [email protected]. Save and close the file. Restart sshd with the command sudo systemctl restart sshd.
Secure Shell will now handiest permit entry via consumer jack, from IP deal with 192.168.1.162. If a person, other than jack, tries to SSH into the server.
They’ll be brought about for a password, but the password will not be universal (regardless if it’s accurate), and entrance will be denied.
You can employ wildcards, such that each one customers from a selected IP Address are granted access.
Say you want to allow all customers in your local location network so that you can get admission to the server through ssh. You might upload the subsequent line:
AllowUsers *@192.168.1.*Restart the ssh server, and you’re good to go.
Harden Ubuntu Server 18.04,Include a Security Login Banner
Although adding a protection login banner might not look like the handiest protection measure you can enact, it does have its blessings.
For instance, if an undesirable person profits get right of entry to for your server, and if they see you’ve taken the effort and care to include particular records in a login banner (caution them of the effects of their moves).
They may assume two times approximately persevering with on. This is such an easy step, it should not be omitted. How to you place this up? Like so.
First, create a custom login banner by way of following those steps:
Open a terminal window. Issue the command sudo nano /and so forth/problem.Net. Edit the record to add a suitable warning. Save and near the report.
Next, disable the banner message from Message Of The Day (motd). Open a terminal and problem the command:
sudo nano /etc/pam.d/sshdWith this file open for editing, comment out the following two lines (adding a # to the beginning of each line):
session optional pam_motd.so motd=/run/motd.dynamic
session optional pam_motd.so noupdate
Next, open the /etc/ssh/sshd_config with the command:
sudo nano /etc/ssh/sshd_configUncomment the line (remove the # symbol):
Banner /etc/issue.net
Save and close that file.
Restart the SSH server with the command:
sudo systemctl restart sshdAt this point, every time someone logs into your server, via ssh, they will see your newly brought banner warning them of any consequences of in addition movement.
Restrict SU Access
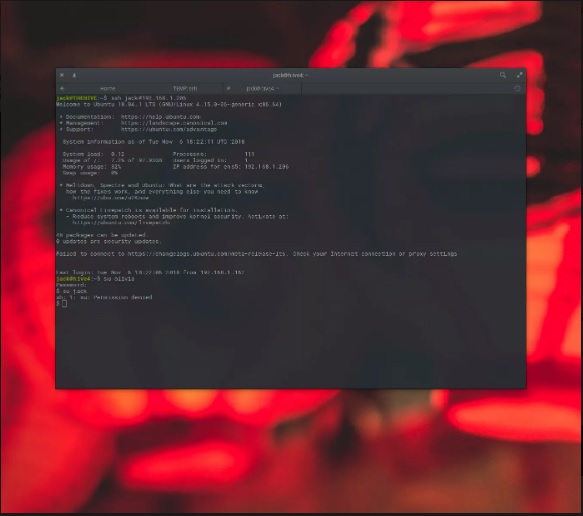
Unless configured in any other case, Linux customers are capable of use the su command to alternate to a exceptional consumer.
When they do that, they then gain the privileges granted to that different person.
So if person A (who has constrained get entry to to the server) makes use of su to trade to consumer B (who has much less restrained access to the server).
consumer A is now consumer B and can do greater to the server. Because of this, you’ll want to disable get entry to to the su command.
The first element to do is create a brand new admin group on the server.Do this with the command:
sudo groupadd adminNext add customers to this organization. Say you need to feature user jack to the institution. The command for that is:
sudo usermod -a -G admin jackIf you’re logged in as person jack, you’ll have to log off and log returned in for the adjustments to take effect.
Now we supply get entry to to su command to the admin group with the command:
sudo dpkg-statoverride --update --add root admin 4750 /bin/suIf you login to your Ubuntu server as the consumer jack, and attempt to use the su command to switch to another consumer.
It will likely be allowed. Why? Because jack is a member of admin. Any different user may be denied get entry to to the su command
Install fail2ban
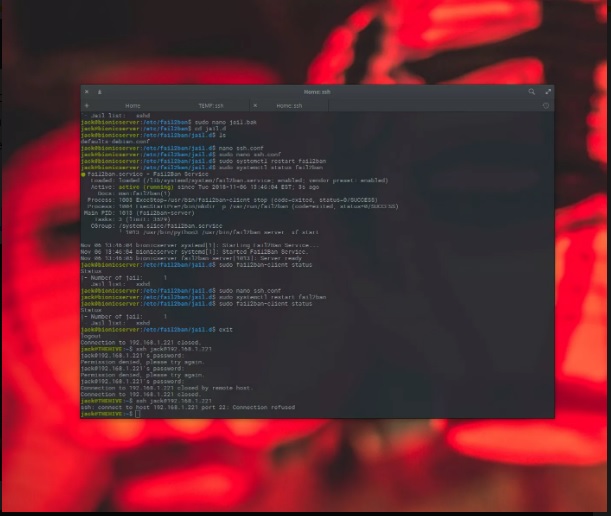
The fail2ban system is an intrusion prevention machine that video display units log files and searches for specific styles that correspond to a failed login try.
If a positive wide variety of failed logins are detected from a selected IP cope with (within a certain amount of time), fail2ban will block get admission to from that IP cope with.
To set up fail2ban, open a terminal window and problem the command:
sudo apt-get install fail2banWithin the directory /and many others/fail2ban, you will locate the main configuration report, jail.Conf. Also in that listing is the subdirectory, prison.D.
The jail.Conf document is the principle configuration record, and prison.D contains the secondary configuration files.
Do no longer edit the prison.Conf file. Instead, we’ll create a brand new configuration to be able to display SSH logins with the command:
sudo nano /etc/fail2ban/jail.localIn this new file add the following contents:
[sshd]
enabled = true
port = 22
filter = sshd
logpath = /var/log/auth.log
maxretry = 3
This configuration does the subsequent:
Enables the jail. Sets the SSH port to be monitored to 22. Uses the sshd filter out. Sets the log document to be monitored. Save and close that file. Restart fail2ban with the command:
sudo systemctl restart fail2banIf you try and Secure Shell into that server, and fail the login 3 instances (set because the default by fail2ban).
Get right of entry to could be then blocked from the IP cope with you are running from.